
12:25 PM
Garrett and I had to drive Annie down to Richmond to enjoy the Inauguration Festivities (not for me, thanks!), so on the way back we dropped in on the NOVAG GAME DAY, located at the Woodbridge Game Parlor game store. We were going to attend in any case-- Garrett enjoys games, although his attention span is what you would expect from a 7 year old.
We got there after the event started, but not that late. There were four tables going, with events on each one-- George Callinan's new Greek Independence Rules game, Hayley running FLAMES OF WAR, Steve Robinson running a terrific Trench Wars system game, and Roxanne Patton running The Battle of Inyezane. Tim Tilson saw me and wagged me over, handing off his small command of cavalry (Boer volunteers, I think) and Natal militia, as he had to be busy doing NOVAG stuff.
I set up Garrett with some amusement and took command.
The scenario is described thusly:
NOTE: January 22, 1879. The right wing of the British advance into Zululand is Col. Pearson’s column. An impi 6,000 Zulus lie in ambush at the Inyezane River. Remarkable leadership by Col. Pearson and exemplary conduct by a young Navy Midshipman rally the Queen's colonial forces in the face of overwhelming odds. This is just one of 10 scenarios from the Zulu war that will be published later this year by Colonial Campaigns.
The battlefield was a river crossing at the bottom of the field (the Inyenaze River), with only one practicable fording point.
The three-pronged hill was the dominating feature of the field- See Figure 1.
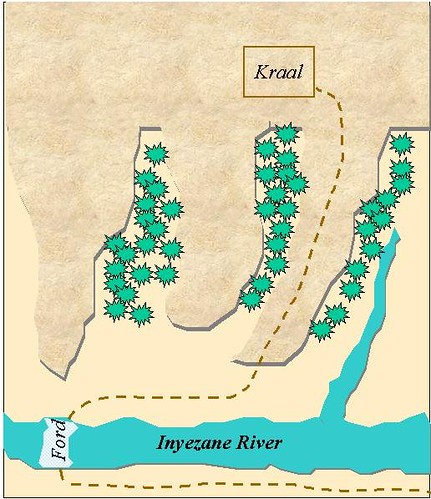
Figure 1: Basic Terrain of battlefield
Terrain: The road (brown dashes) crosses the ford, cuts right and heads up the right-most hill. The green shrubs markers indicate "rough" terrain at a lower level of elevation. You can shoot over it but not into it with any degree of accuracy. If a zulu stand moves into "rough" it essentially disappears from view unless contacted in melee. The Kraal was our objective point, and the major source of victory points. The Inyenaze was uncrossable except at one point (which caused the inevitable traffic jam) and the smaller stream pointing north was crossable. Going up hill (on one of the three "forks") greatly reduces movement.
Recap Notes: For the most part, much of this recounting is compressed, as I wasn't there at start and had to leave about half an hour early, as well as constantly trying to keep Garrett amused. I don't have the OOB handy so instead of specifying I'll just say "Infantry" "Engineers" "big pack of Zulus" "Sailors" etc. Standard NATO symbols prevail in the following illustrations, as well as "M" for milita, a boxed arrow for Zulus, and G for Gatling guns. The Brits are uniformly red except for Naval Infantry (blue) and the naval Gatling (also blue). The wagons have their own symbol, as they are a victory condition for the zulus. (Yes, normally I take pictures, but I left my camera home for once)
As I recall, the Brit side gets VPs for kiling zulus and getting to the kraal. The zulu side gets points for killing English and capturing wagons.
The rules are modified BROTHER AGAINST BROTHER, a system that I like, in general.
Figure 2 is a very generalized representation of how the scenario looked as I joined the game. I'm in charge of our only cavalry unit (which was a Boer volunteer horse thing, trained and well armed, but not exactly the Heavy Brigade, either). I also am in charge of the NNC (Natal Native Contingent, the Militia unit (red box with M). We can see movement in the rough up ahead on the right hand side, but can't really "see" it as the Zulus are advancing in cover. Being scout types, we spurred on ahead.
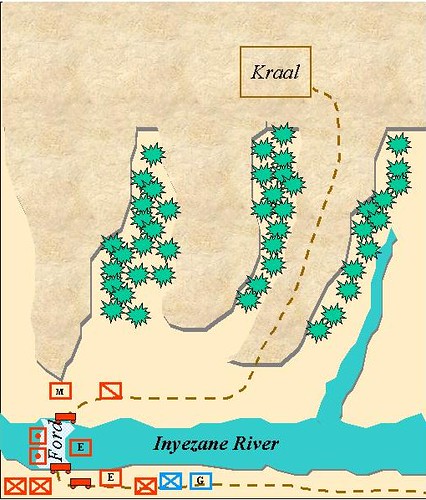
Figure 2: SITREP at start (roughly.. there may have been some British Inf across the river at this point, but they hadn't gotten very far).
Figure 3 depicts the nasty suprise waiting for my two "speed bump" units as we manfully advanced upon the right and center hills. Up jumps some "ndoklos" of zulus (small tactical unit designation),, it wasn't a HUGE suprise, as I knew they were coming with my God-like view of the battle, but in real life terms the bush would have erupted with asegi-wielding fiends at this point.. enough to give the stoutest soul some pause.
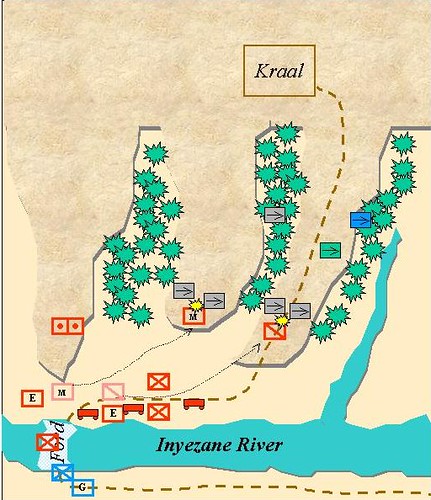
Figure 3: "Zulus, sah! The hills are crawling wif 'em!">
I believe the NNC actually engaged the oppossing Zulu force in the rough area in the middle, but that's really not important. Suffice to say that in the time-honored fashion of native militia, they balked at going in (half of 'em, anyhow) and those that DID engage took hideous casualties. On the right hill, the Volunteer cavalry did not fare very well, being charged by a full ndoklo of zulus, taking bad (but not hideous) casaulties, and being forced to make a retreat (a strategic regrouping, of course!)
I'd like to say that my selfless sacrifice did something important, like slow up the zulus long enough for my British comrades to get in line or something. But we didn't, not really. We did fall back in time to reform (what was left).
Figure 4 shows the Zulus swarming over the speed bumps and running down the hills to engage the British infantry. On a more ominous note, that grey line in the back is the MAIN ZULU FORCE (well, really just the start of it). They had finally rolled their entry roll, after sitting around for 3 turns doing nothing. And boy did they come on quick!!!
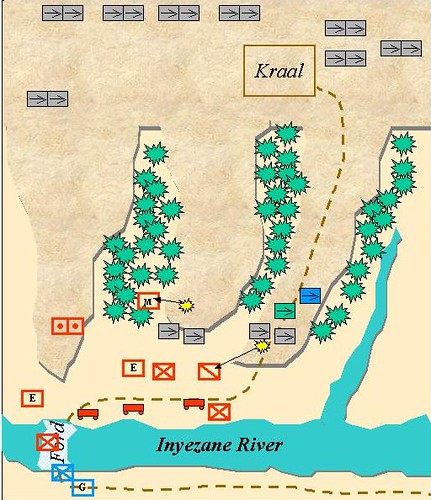
Figure 4: Lead zulus start to engage English Inf. as the main zulu force arrives on the map
At this stage, most of our wagons (if not all) were across the river. The lead wagon was being threatened by some elite zulus on the right(blue or green, it's a Brother Versus Brother thing). We were not going to give up a wagon without a fight (and give away VPs) so we rushed troops to our right to engage the uber-zulus.
Figure 5 shows the threat on the left clearly. The "right horn" of the zulu attack was coming on hot and heavy and the artillery boys had just set up on the lefthand hill to try to enfilade the zulu advance. Hmmmm. Not a good spot to be without Infantry!!!
And more zulus shift from the our right to our left, hidden in the rough...
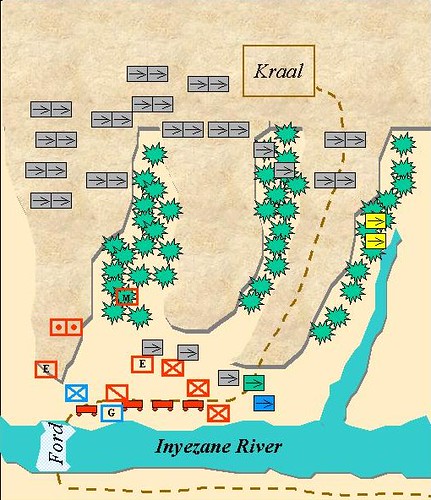
Figure 5: threat on the left, moving the Gatlings over to engage the elite zulus
By this time, we had shot up some of the zulu units and caused them to break(see the yellow units), and they fled to the valley beyond the rightmost hill. Most of this was caused by ranged gunfire-- melee with zulus is a losing proposition.
Figure 6 shows our frantic efforts to adjust to the forces piling up on the left hand hill. The artillery gets off some nice enfilade fire on the center hill, causing great, grisly holes to show up in some of the ndoklos, but the REAL threat is coming on very quickly to the left, and can we shift the cannons in time? The player running the arty realizes the problem and rushes some armed engineers up the hill to help defend the guns. On the right, ndoklos from the center and right hill stream down to engage the wagon train and the infantry defending it. Here is where the British did wonderful execution of volley fire, gradually decimating those zulus.
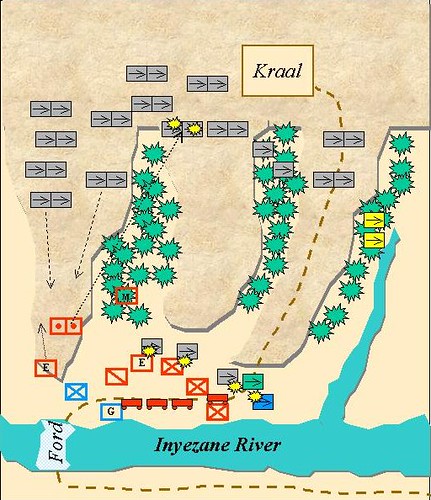
Figure 6: Redcoats fight back!
Unfortunately, where the zulus meleed, they were killing machines, and the center of the British line did get cut up severely. At this point, my little command is reforming, and generally trying to find something useful to do.
Figure 7 shows the situation just a wee bit later. At this stage the artillery and engineers on the left hand hill are meleeing with the ONE ndoklo that can fit, and doing better than anybody else has in a stand up brawl with zulus. The naval infantry is advancing on the double quick to support the artillery. The Engineers and Infantry in the center are still fighting with the last of the Ndoklos from the earlier attack, and the Engineers (if I'm remembering right) got chopped up badly. However, the other two infantry in the center did a tremendous job of volley firing the zulus into zulu paradise.
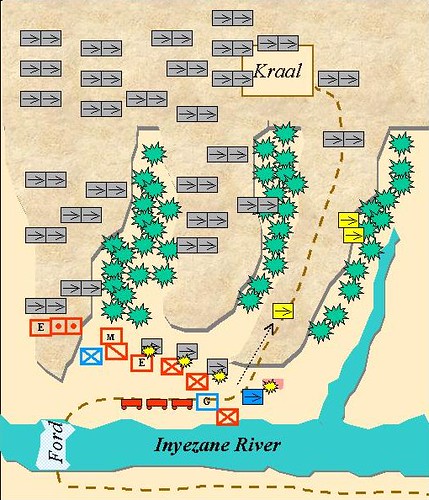
Figure 7: Go you Redcoats! But we lose a wagon!
Note, also, that the Zulus did manage to strike a blow, and destroy one of our wagons, getting points for the effort.
Finallly, I do manage something useful. Figure 8 shows the battle at pretty close to finish-- we had a half hour to go and I had to bail soon as I had a very bored 7 year old to take care of. While the ndoklo was chopping up the Engineers, I had reformed my volunteer cavalry, wheeled it around and charged the flank of the attacking zulu unit, chopping THEM up into chutney for a change. And right after that, my overall leader card was called, so I did it again! This did a number on the attack in the center. On the right, the Gatling had come up but there hardly were any zulus to attack with it at that moment.
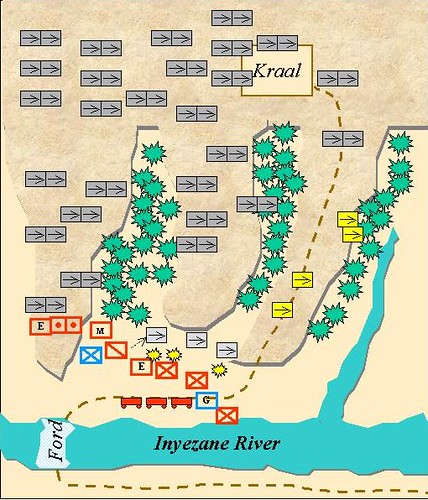
Figure 8: Where the battle ended for me!
A HUGE wave of zulus was advancing at this point, and so the game might have gone very differently if it had gone on for a few more hours. As it was it looked as if the Brits had the right and center flanks pretty much in hand, and were threatened on the left.
Alas, I had to leave before Garrett got snotty. My general impression was that the game would be a hard-fought victory, at best. We had caused horrendous casualties and flight in the advance of the Zulu attack (on the right) but were severely threatened on the left. Our best weapon, the Gatling, was not in the right place and would have to move to the left flank PDQ.
With only half an hour to go before the event was over, it was anyone's guess as to victory, but I would have given it to the Brits by a thin margin. MOST of the Zulus did not engage (through no fault of their own, just bad activation rolls). Where Brits and Zulus meleed, the brits were often the loser-- they had fewer figures per stand and that gives the zulus quite an advantage. However, volley fire (and presumably, the Gatling) might have made up for it.
FOLLOW UP: Apparently a lot happened in that half hour. Dave Markley reports that the artillery on the left was quickly overrun. The British didn't do nearly as good as I thought they did. With points given for capture of the kraal and for every zulu unit destroyed (and mind you, zulu units were freakin' huge...), the Brits only had 8 points and they needed 12. The Zulus did terrible damage to the Brits but didn't really wipe out more than one unit (though there were lots of reduced stands running around). Add to that the zulus were figuring out that their best advantage came from advancing through the dongas (those little shallow rough areas).
Technically, it was a draw. Neither side killed enough to rate "victory" but the Zulus had the advantage of terrain that the Brits did not. So, change the slim advantage to the Zulus...
Still, a fun game. Dave thought there were too many figures for the battlespace and he might have a point. It was very crowded and the zulus didn't really attack like the classic horns and and head motion because of the terrain.. the dongas broke up the MASS of the attack so they could only bring a certain amount of force to bear in selected areas. Still, that "hiding in the donga" super power was a nice compensation prize.
We got there after the event started, but not that late. There were four tables going, with events on each one-- George Callinan's new Greek Independence Rules game, Hayley running FLAMES OF WAR, Steve Robinson running a terrific Trench Wars system game, and Roxanne Patton running The Battle of Inyezane. Tim Tilson saw me and wagged me over, handing off his small command of cavalry (Boer volunteers, I think) and Natal militia, as he had to be busy doing NOVAG stuff.
I set up Garrett with some amusement and took command.
The scenario is described thusly:
NOTE: January 22, 1879. The right wing of the British advance into Zululand is Col. Pearson’s column. An impi 6,000 Zulus lie in ambush at the Inyezane River. Remarkable leadership by Col. Pearson and exemplary conduct by a young Navy Midshipman rally the Queen's colonial forces in the face of overwhelming odds. This is just one of 10 scenarios from the Zulu war that will be published later this year by Colonial Campaigns.
The battlefield was a river crossing at the bottom of the field (the Inyenaze River), with only one practicable fording point.
The three-pronged hill was the dominating feature of the field- See Figure 1.
Terrain: The road (brown dashes) crosses the ford, cuts right and heads up the right-most hill. The green shrubs markers indicate "rough" terrain at a lower level of elevation. You can shoot over it but not into it with any degree of accuracy. If a zulu stand moves into "rough" it essentially disappears from view unless contacted in melee. The Kraal was our objective point, and the major source of victory points. The Inyenaze was uncrossable except at one point (which caused the inevitable traffic jam) and the smaller stream pointing north was crossable. Going up hill (on one of the three "forks") greatly reduces movement.
Recap Notes: For the most part, much of this recounting is compressed, as I wasn't there at start and had to leave about half an hour early, as well as constantly trying to keep Garrett amused. I don't have the OOB handy so instead of specifying I'll just say "Infantry" "Engineers" "big pack of Zulus" "Sailors" etc. Standard NATO symbols prevail in the following illustrations, as well as "M" for milita, a boxed arrow for Zulus, and G for Gatling guns. The Brits are uniformly red except for Naval Infantry (blue) and the naval Gatling (also blue). The wagons have their own symbol, as they are a victory condition for the zulus. (Yes, normally I take pictures, but I left my camera home for once)
As I recall, the Brit side gets VPs for kiling zulus and getting to the kraal. The zulu side gets points for killing English and capturing wagons.
The rules are modified BROTHER AGAINST BROTHER, a system that I like, in general.
Figure 2 is a very generalized representation of how the scenario looked as I joined the game. I'm in charge of our only cavalry unit (which was a Boer volunteer horse thing, trained and well armed, but not exactly the Heavy Brigade, either). I also am in charge of the NNC (Natal Native Contingent, the Militia unit (red box with M). We can see movement in the rough up ahead on the right hand side, but can't really "see" it as the Zulus are advancing in cover. Being scout types, we spurred on ahead.
Figure 3 depicts the nasty suprise waiting for my two "speed bump" units as we manfully advanced upon the right and center hills. Up jumps some "ndoklos" of zulus (small tactical unit designation),, it wasn't a HUGE suprise, as I knew they were coming with my God-like view of the battle, but in real life terms the bush would have erupted with asegi-wielding fiends at this point.. enough to give the stoutest soul some pause.
I believe the NNC actually engaged the oppossing Zulu force in the rough area in the middle, but that's really not important. Suffice to say that in the time-honored fashion of native militia, they balked at going in (half of 'em, anyhow) and those that DID engage took hideous casualties. On the right hill, the Volunteer cavalry did not fare very well, being charged by a full ndoklo of zulus, taking bad (but not hideous) casaulties, and being forced to make a retreat (a strategic regrouping, of course!)
I'd like to say that my selfless sacrifice did something important, like slow up the zulus long enough for my British comrades to get in line or something. But we didn't, not really. We did fall back in time to reform (what was left).
Figure 4 shows the Zulus swarming over the speed bumps and running down the hills to engage the British infantry. On a more ominous note, that grey line in the back is the MAIN ZULU FORCE (well, really just the start of it). They had finally rolled their entry roll, after sitting around for 3 turns doing nothing. And boy did they come on quick!!!
At this stage, most of our wagons (if not all) were across the river. The lead wagon was being threatened by some elite zulus on the right(blue or green, it's a Brother Versus Brother thing). We were not going to give up a wagon without a fight (and give away VPs) so we rushed troops to our right to engage the uber-zulus.
Figure 5 shows the threat on the left clearly. The "right horn" of the zulu attack was coming on hot and heavy and the artillery boys had just set up on the lefthand hill to try to enfilade the zulu advance. Hmmmm. Not a good spot to be without Infantry!!!
And more zulus shift from the our right to our left, hidden in the rough...
By this time, we had shot up some of the zulu units and caused them to break(see the yellow units), and they fled to the valley beyond the rightmost hill. Most of this was caused by ranged gunfire-- melee with zulus is a losing proposition.
Figure 6 shows our frantic efforts to adjust to the forces piling up on the left hand hill. The artillery gets off some nice enfilade fire on the center hill, causing great, grisly holes to show up in some of the ndoklos, but the REAL threat is coming on very quickly to the left, and can we shift the cannons in time? The player running the arty realizes the problem and rushes some armed engineers up the hill to help defend the guns. On the right, ndoklos from the center and right hill stream down to engage the wagon train and the infantry defending it. Here is where the British did wonderful execution of volley fire, gradually decimating those zulus.
Unfortunately, where the zulus meleed, they were killing machines, and the center of the British line did get cut up severely. At this point, my little command is reforming, and generally trying to find something useful to do.
Figure 7 shows the situation just a wee bit later. At this stage the artillery and engineers on the left hand hill are meleeing with the ONE ndoklo that can fit, and doing better than anybody else has in a stand up brawl with zulus. The naval infantry is advancing on the double quick to support the artillery. The Engineers and Infantry in the center are still fighting with the last of the Ndoklos from the earlier attack, and the Engineers (if I'm remembering right) got chopped up badly. However, the other two infantry in the center did a tremendous job of volley firing the zulus into zulu paradise.
Note, also, that the Zulus did manage to strike a blow, and destroy one of our wagons, getting points for the effort.
Finallly, I do manage something useful. Figure 8 shows the battle at pretty close to finish-- we had a half hour to go and I had to bail soon as I had a very bored 7 year old to take care of. While the ndoklo was chopping up the Engineers, I had reformed my volunteer cavalry, wheeled it around and charged the flank of the attacking zulu unit, chopping THEM up into chutney for a change. And right after that, my overall leader card was called, so I did it again! This did a number on the attack in the center. On the right, the Gatling had come up but there hardly were any zulus to attack with it at that moment.
A HUGE wave of zulus was advancing at this point, and so the game might have gone very differently if it had gone on for a few more hours. As it was it looked as if the Brits had the right and center flanks pretty much in hand, and were threatened on the left.
Alas, I had to leave before Garrett got snotty. My general impression was that the game would be a hard-fought victory, at best. We had caused horrendous casualties and flight in the advance of the Zulu attack (on the right) but were severely threatened on the left. Our best weapon, the Gatling, was not in the right place and would have to move to the left flank PDQ.
With only half an hour to go before the event was over, it was anyone's guess as to victory, but I would have given it to the Brits by a thin margin. MOST of the Zulus did not engage (through no fault of their own, just bad activation rolls). Where Brits and Zulus meleed, the brits were often the loser-- they had fewer figures per stand and that gives the zulus quite an advantage. However, volley fire (and presumably, the Gatling) might have made up for it.
FOLLOW UP: Apparently a lot happened in that half hour. Dave Markley reports that the artillery on the left was quickly overrun. The British didn't do nearly as good as I thought they did. With points given for capture of the kraal and for every zulu unit destroyed (and mind you, zulu units were freakin' huge...), the Brits only had 8 points and they needed 12. The Zulus did terrible damage to the Brits but didn't really wipe out more than one unit (though there were lots of reduced stands running around). Add to that the zulus were figuring out that their best advantage came from advancing through the dongas (those little shallow rough areas).
Technically, it was a draw. Neither side killed enough to rate "victory" but the Zulus had the advantage of terrain that the Brits did not. So, change the slim advantage to the Zulus...
Still, a fun game. Dave thought there were too many figures for the battlespace and he might have a point. It was very crowded and the zulus didn't really attack like the classic horns and and head motion because of the terrain.. the dongas broke up the MASS of the attack so they could only bring a certain amount of force to bear in selected areas. Still, that "hiding in the donga" super power was a nice compensation prize.